I’ve been playing with our new Miter Gear Set for a little while now and I can’t believe how easy it is to build a drive train! Following is a short picture tutorial on how I did just that.
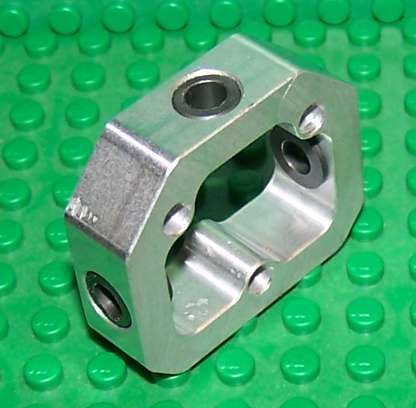
Step 1 Using the miter gear box, the middle size steel axle, and one of the miter gears, insert the axle through the gear box and one of the miter gears. Once the axle is centered, lock the miter gear onto the axle by tightening the set screw on the side of the gear. I chose the middle axle size so that my wheelbase would match the other end of my vehicle using a 15L liftarm. If you wanted to use the drive train with the Crossover 19L Aluminum Liftarms for your steering mechanism, the longer axle would be the better choice.
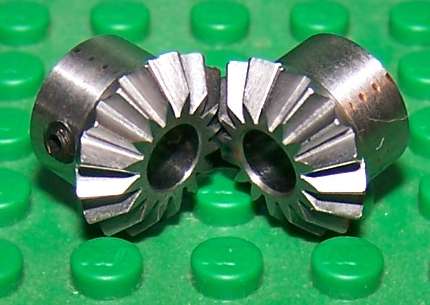
Step 2 Take the second miter gear and slide it into place where it mates with the first gear and then insert the short axle into the top of the gear box. Once it is fully inserted into the miter gear, lock it down as well. Here is the finished result from steps 1 and 2:

Step 3 Attach the wheel hubs to the ends of the drive axle. These wheel hubs are made to be used with any LEGO wheels that support the triple pin connection. In this tutorial, I happen to be using the 62mm wheels from the Silver Champion Formula Racer. 🙂 This is what the wheel looks like with and without the hub:

And this is the assembly with the hubs on the axles.

Step 4 Attach the wheels to the hub. The hubs can be attached to the wheel using standard LEGO pins or they can be through-bolted using the included 10-24 cap screws.
Step 5 Attach the gear hub to either a 24 or 40 tooth LEGO gear. A 24 tooth gear is included in the set. This assembly will drive the wheels through the miter gears. Attach the assembly to the drive shaft locking it down to the axle with an allen wrench. Here is your final assembly.

Overall, it took about 10 minutes to put it all together. It would have been less, but I had to find the wheels. Below, I’m including another example build displaying an entire vehicle frame made with the gear kit and a mix of LEGO and aluminum elements from our shop. The drive shaft is being power by two Large Power Functions Motors. You may notice the gear box is slightly different. This was an earlier prototype. The new gearbox included with the miter gear kit is designed to be sealable to protect it from dirt and grime outdoors.

Play well!